Introduction
The Serial Peripheral Interface is a synchronous serial communication interface for short-distance communication, it is typically used in embedded systems. The interface was developed by Motorola in the mid 1980’s and has become a very popular standard.
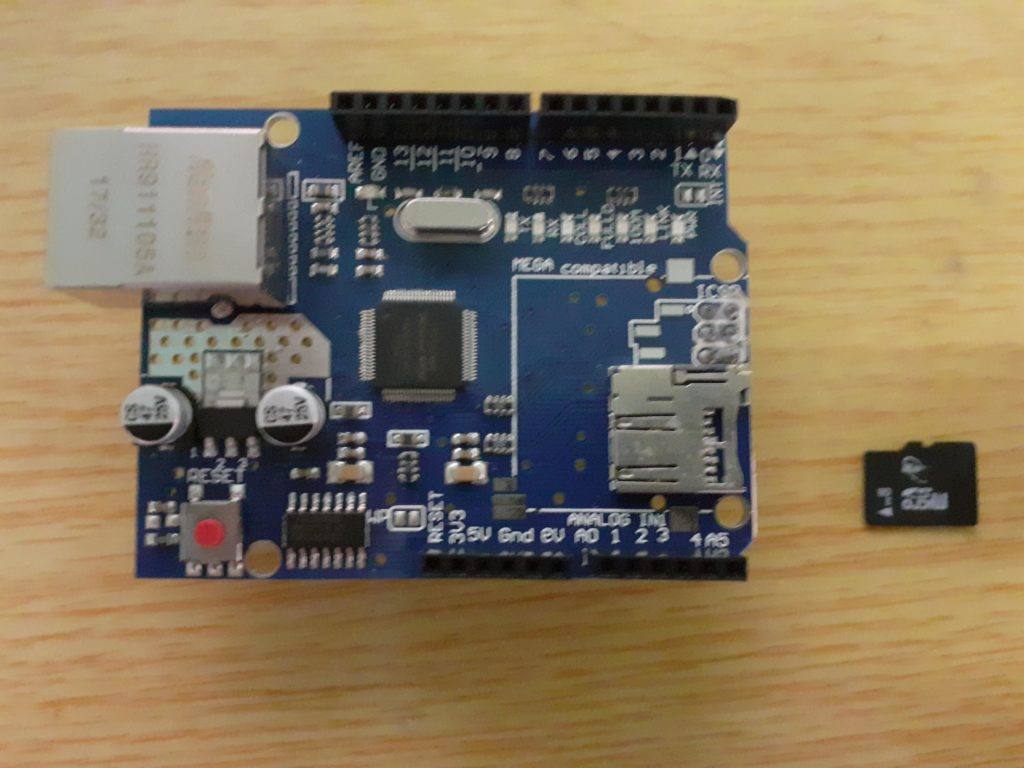
It is used with many kinds of sensors, LCD’s and also SD-Cards. SPI operates in a Master-Slave model, with a possibility of multiple slave devices, each selected in turn by a SS (slave select) or CS (chip select) pin that is usually pulled low by the master.

Typical configuration
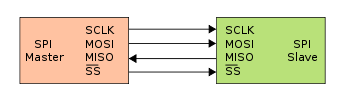
SPI is a four-wire interface, with the different lines being
– MOSI [Master Out Slave In]
-MISO [Master In Slave Out]
-SCLK [Serial Clock OUT – generated by the master]
-SS/CS [Slave Select or Chip Select, sometimes also labelled CE – Chip Enable]
SPI is a FULL DUPLEX interface, where the master initiates the communication frames between the various slave devices. This is usually done by pulling the particular device’s SS/CS pin low. Data is then shifted simultaneously into and out of the devices by means of the MOSI and MISO lines on the bus. The frequency of the serially shifted data is controlled by the SCLK line. This clock signal is generated by the master device.
It is important to note that MOST of the slave devices have a tri-state (HIGH IMPEDANCE) mode on their MISO pins. This electrically disconnects the MISO pin from the bus when the device is not selected via the SS/CS pin.
You should also note the SPI slave devices that do not have a tri-state mode on their MISO pins, should not be used on the same bus as devices that have without using an external tri-state buffer circuit between the non-tristate device and the rest of the devices on the MISO bus.
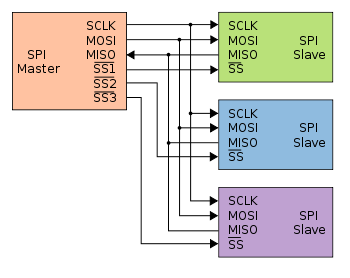
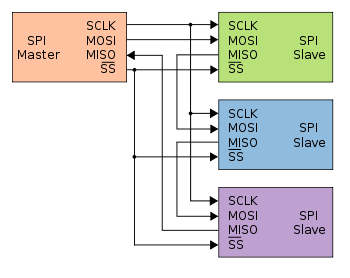
It is possible to connect multiple SPI slave devices to on Master device if you remember that each slave device will need its own dedicated SS/CS pin on the master. This can however quickly use a lot of IO pins on a microcontroller, thus being one of the disadvantages of SPI versus I2C. SPI is however quite a bit faster than I2C.
Data Transmission
To begin communication, the bus master configures the clock, using a frequency supported by the slave device, typically up to a few MHz. The master then selects the slave device with a logic level 0 on the select line. If a waiting period is required, such as for an analog-to-digital conversion, the master must wait for at least that period of time before issuing clock cycles.
During each SPI clock cycle, full-duplex data transmission occurs. The master sends a bit on the MOSI line and the slave reads it, while the slave sends a bit on the MISO line and the master reads it. This sequence is maintained even when only one-directional data transfer is intended.
Transmissions normally involve two shift registers of some given word-size, such as eight bits, one in the master and one in the slave; they are connected in a virtual ring topology. Data is usually shifted out with the most significant bit first. On the clock edge, both master and slave shift out a bit and output it on the transmission line to the counterpart. On the next clock edge, at each receiver the bit is sampled from the transmission line and set as a new least-significant bit of the shift register. After the register bits have been shifted out and in, the master and slave have exchanged register values. If more data needs to be exchanged, the shift registers are reloaded and the process repeats. Transmission may continue for any number of clock cycles. When complete, the master stops toggling the clock signal, and typically deselects the slave.
Transmissions often consist of eight-bit words. However, other word-sizes are also common, for example, sixteen-bit words for touch-screen controllers or audio codecs, such as the TSC2101 by Texas Instruments, or twelve-bit words for many digital-to-analogue or analogue-to-digital converters.
Every slave on the bus that has not been activated using its chip select line must disregard the input clock and MOSI signals and should not drive MISO (I.E. must have a tri-state output) although some devices need external tri-state buffers to implement this.
Clock polarity and phasing
In addition to setting the clock frequency, the master must also configure the clock polarity and phase with respect to the data. Motorola SPI Block Guide names these two options as CPOL and CPHA (for clock polarity and phase) respectively, a convention most vendors have also adopted.
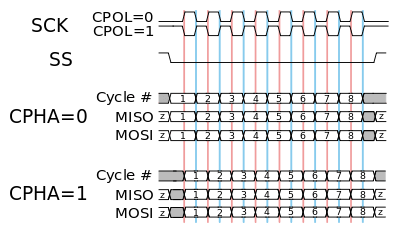
The timing diagram is shown below. The timing is further described below and applies to both the master and the slave device.
- CPOL determines the polarity of the clock. The polarities can be converted with a simple inverter.
- CPOL=0 is a clock which idles at 0, and each cycle consists of a pulse of 1. That is, the leading edge is a rising edge, and the trailing edge is a falling edge.
- CPOL=1 is a clock which idles at 1, and each cycle consists of a pulse of 0. That is, the leading edge is a falling edge, and the trailing edge is a rising edge.
- CPHA determines the timing (i.e. phase) of the data bits relative to the clock pulses. Conversion between these two forms is non-trivial.
- For CPHA=0, the “out” side changes the data on the trailing edge of the preceding clock cycle, while the “in” side captures the data on (or shortly after) the leading edge of the clock cycle. The out-side holds the data valid until the trailing edge of the current clock cycle. For the first cycle, the first bit must be on the MOSI line before the leading clock edge.
- An alternative way of considering it is to say that a CPHA=0 cycle consists of a half cycle with the clock idle, followed by a half cycle with the clock asserted.
- For CPHA=1, the “out” side changes the data on the leading edge of the current clock cycle, while the “in” side captures the data on (or shortly after) the trailing edge of the clock cycle. The out-side holds the data valid until the leading edge of the following clock cycle. For the last cycle, the slave holds the MISO line valid until slave select is de-selected.
- An alternative way of considering it is to say that a CPHA=1 cycle consists of a half cycle with the clock asserted, followed by a half cycle with the clock idle.
The MOSI and MISO signals are usually stable (at their reception points) for the half cycle until the next clock transition. SPI master and slave devices may well sample data at different points in that half cycle.
This adds more flexibility to the communication channel between the master and slave.
Mode numbers
The combinations of polarity and phases are often referred to as modes which are commonly numbered according to the following convention, with CPOL as the high order bit and CPHA as the low order bit:
For “Microchip PIC” / “ARM-based” microcontrollers (note that NCPHA is the inversion of CPHA):
| SPI mode | Clock polarity (CPOL/CKP) | Clock phase (CPHA) | Clock edge (CKE/NCPHA) |
|---|---|---|---|
| 0 | 0 | 0 | 1 |
| 1 | 0 | 1 | 0 |
| 2 | 1 | 0 | 1 |
| 3 | 1 | 1 | 0 |
| Mode | CPOL | CPHA |
|---|---|---|
| 0 | 0 | 0 |
| 1 | 0 | 1 |
| 2 | 1 | 0 |
| 3 | 1 | 1 |
Another commonly used notation represents the mode as a (CPOL, CPHA) tuple; e.g., the value ‘(0, 1)’ would indicate CPOL=0 and CPHA=1.
Note that in Full Duplex operation, the Master device could transmit and receive with different modes. For instance, it could transmit in Mode 0 and be receiving in Mode 1 at the same time.
Independent Slave Configuration
In the independent slave configuration, there is an independent chip select line for each slave. This is the way SPI is normally used. The master asserts only one chip select at a time.
Pull-up resistors between the power source and chip select lines are recommended for systems where the master’s chip select pins may default to an undefined state. When separate software routines initialize each chip select and communicate with its slave, pull-up resistors prevent other uninitialized slaves from responding.
Since the MISO pins of the slaves are connected together, they are required to be tri-state pins (high, low or high-impedance), where the high-impedance output must be applied when the slave is not selected. Slave devices not supporting tri-state may be used in independent slave configuration by adding a tri-state buffer chip controlled by the chip select signal. (Since only a single signal line needs to be tri-stated per slave, one typical standard logic chip that contains four tristate buffers with independent gate inputs can be used to interface up to four slave devices to an SPI bus.)
Daisy chain configuration
Some products that implement SPI may be connected in a daisy chain configuration, the first slave output being connected to the second slave input, etc. The SPI port of each slave is designed to send out during the second group of clock pulses an exact copy of the data it received during the first group of clock pulses. The whole chain acts as a communication shift register; daisy chaining is often done with shift registers to provide a bank of inputs or outputs through SPI. Each slave copies input to output in the next clock cycle until the active low SS line goes high. Such a feature only requires a single SS line from the master, rather than a separate SS line for each slave.
Note that not all SPI devices support this. You should thus check your datasheet before using this configuration!
Valid Communications
Some slave devices are designed to ignore any SPI communications in which the number of clock pulses is greater than specified. Others do not care, ignoring extra inputs and continuing to shift the same output bit. It is common for different devices to use SPI communications with different lengths, as, for example, when SPI is used to access the scan chain of a digital IC by issuing a command word of one size (perhaps 32 bits) and then getting a response of a different size (perhaps 153 bits, one for each pin in that scan chain).
Interrupts
SPI devices sometimes use another signal line to send an interrupt signal to a host CPU. Examples include pen-down interrupts from touchscreen sensors, thermal limit alerts from temperature sensors, alarms issued by real-time clock chips, SDIO, and headset jack insertions from the sound codec in a cell phone. Interrupts are not covered by the SPI standard; their usage is neither forbidden nor specified by the standard. In other words, interrupts are outside the scope of the SPI standard and are optionally implemented independently from it.
Bit Banging a SPI Master – Example code
Below is an example of bit-banging the SPI protocol as an SPI master with CPOL=0, CPHA=0, and eight bits per transfer. The example is written in the C programming language. Because this is CPOL=0 the clock must be pulled low before the chip select is activated. The chip select line must be activated, which normally means being toggled low, for the peripheral before the start of the transfer, and then deactivated afterwards. Most peripherals allow or require several transfers while the select line is low; this routine might be called several times before deselecting the chip.
/*
 * Simultaneously transmit and receive a byte on the SPI.
 *
 * Polarity and phase are assumed to be both 0, i.e.:
 *   - input data is captured on rising edge of SCLK.
 *   - output data is propagated on falling edge of SCLK.
 *
 * Returns the received byte.
 */
uint8_t SPI_transfer_byte(uint8_t byte_out)
{
    uint8_t byte_in = 0;
    uint8_t bit;

    for (bit = 0x80; bit; bit >>= 1) {
        /* Shift-out a bit to the MOSI line */
        write_MOSI((byte_out & bit) ? HIGH : LOW);

        /* Delay for at least the peer's setup time */
        delay(SPI_SCLK_LOW_TIME);

        /* Pull the clock line high */
        write_SCLK(HIGH);

        /* Shift-in a bit from the MISO line */
        if (read_MISO() == HIGH)
            byte_in |= bit;

        /* Delay for at least the peer's hold time */
        delay(SPI_SCLK_HIGH_TIME);

        /* Pull the clock line low */
        write_SCLK(LOW);
    }

    return byte_in;
}
This concludes part 1 of my series on SPI. I hope you found it interesting and useful.