
Most of us will not know about RISC-V, or have had access to a RISC-V Chip.
This will thus be truly one of the most difficult posts I have written, due to many factors…
To name a few of these:
– The learning curve is extremely steep because there is extremely limited information available on the chip
– I can not at the moment allowed to divulge any information on the chip used, as I have received a few “sneak-preview” modules, and the manufacturer, who shall also remain anonymous for now, has not released it to the public yet.
– Most of the information available on the BL-602 ( on which the chip is based) is in relation to the BL-IOT-SDK, or Apache NuttX, an RTOS for use with microcontrollers.
While the NuttX project has excellent documentation, it is written in a very technical style, and focused on very basic, very advanced or very specific things. This will hopefully be improved upon to make it more “new-end-user-that-is-learning” friendly in future.
As most of us can no doubt see, This post is quite a challenge. I will thus focus on the PCB I designed to use with the “mystery BL-602” chip, and provide a lot of links to where you can get information on Apache NuttX, as well as how to use it with the BL-602 in general.
Once the module has been officially released, I will do a followup-post, with specific documentation etc, which, although I have already got some of it in my possession, I can not release at the moment for ethical reasons.
I think it fair to tell you all this much, and , unintentionally, have to create anticipation on what and where etc… My apologies for that, but rules are rules, and secrets are meant to be kept, until told otherwise…
So, lets get started. Some links to get you started and show you where this is going…
Apache Nuttx is the RTOS that you will most likely have to use to do anything useful with the BL-602 chip, as well as other microcontrollers, notably the ESP32-S3 and some of the STM32 chips.
Bouffalo Labs are the people behind the BL-602, as well as the BL-IOT-SDK, which will also be quite useful in designing solutions around the BL-602
Run Rust on RISC-V Firmware will provide some excellent points to get started
LEE Lup Yuen seems to be the kind person who has written most of the extensive and useful documentation on NuttX and the BL-602, amongst others…
NuttX Incubator on Github is a very detailed source, also by Mr Lee Lup Yuen, that aims to get us started with the BL-602 and NuttX – This link is HIGHLY recommended!
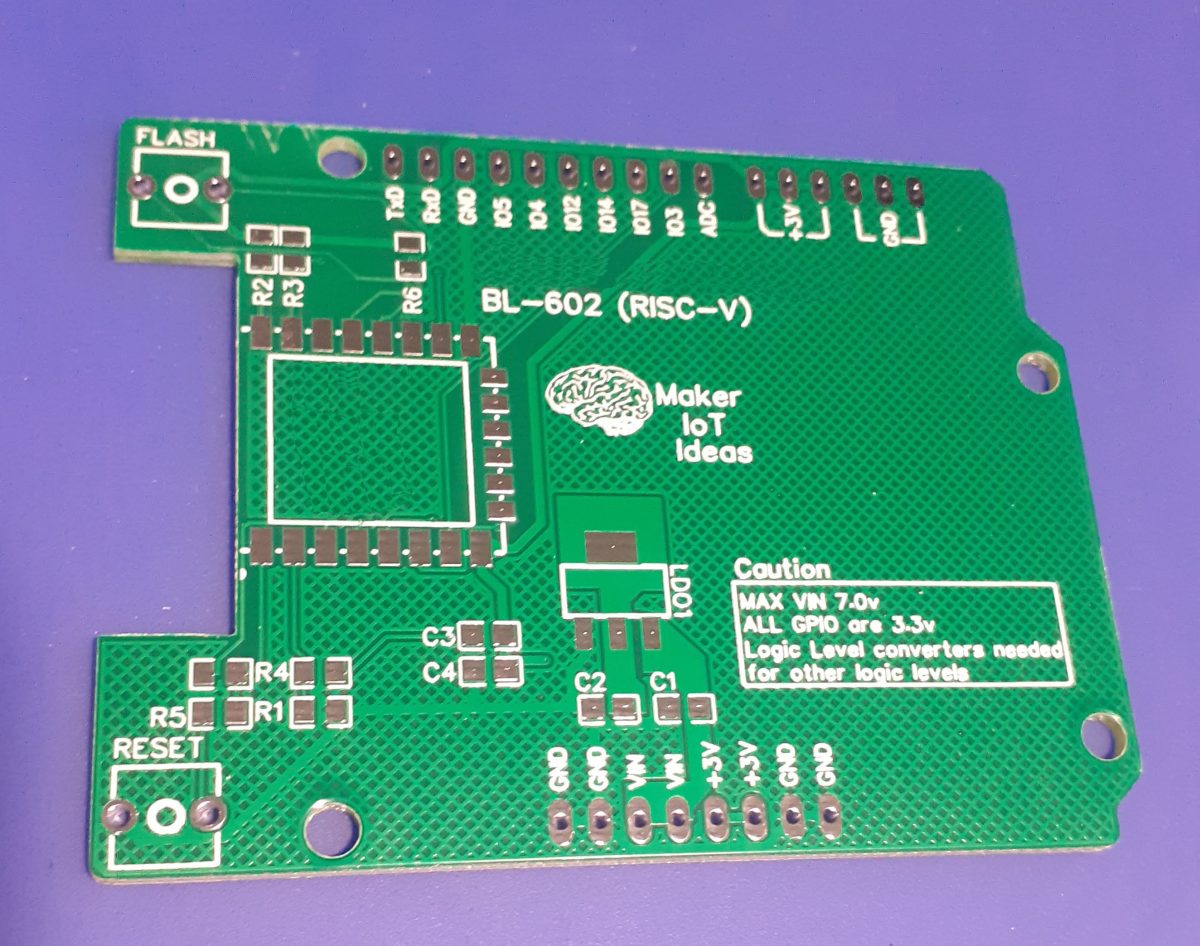
My Prototype PCB

I decided to design an extremely basic, bare PCB with basically just the BL-602 chip and its supporting circuitry. This will allow me to focus only on the chip, as well as provide maximum flexibility in the future by the addition of add-on shields with specific functions. with this in mind, I purposely chose a PCB footprint similar to the Arduino UNO.
It is also worth mentioning that the chip module used on this PCB IS NOT a standard BL-602, although the footprint looks similar.
At the moment, I am however pulled between being frustrated at the lack of available information and also being excited at the possibilities that are already there or will open up in the future.
Needless to say, some people will be frustrated at the “seeming lack of details in this post”. Lets all stay calm, and remember that I will post a followup, with all the details soon.
Manufacturing
Over the past eight years, PCBWay has continuously upgraded their MANUFACTURING plants and equipment to meet higher quality requirements, and now THEY also provide OEM services to build your products from ideas to mass production and access to the market.
The PCB for this project has been manufactured at PCBWay.
Please consider supporting them if you would like your own copy of this PCB, or if you have any PCB of your own that you need to have manufactured.

If you would like to have PCBWAY manufacture one of your own, designs, or even this particular PCB, you need to do the following…
1) Click on this link
2) Create an account if you have not already got one of your own.
If you use the link above, you will also instantly receive a $5 USD coupon, which you can use on your first or any other order later. (Disclaimer: I will earn a small referral fee from PCBWay. This referral fee will not affect the cost of your order, nor will you pay any part thereof.)
3) Once you have gone to their website, and created an account, or login with your existing account,

4) Click on PCB Instant Quote

5) If you do not have any very special requirements for your PCB, click on Quick-order PCB

6) Click on Add Gerber File, and select your Gerber file(s) from your computer. Most of your PCB details will now be automatically selected, leaving you to only select the solder mask and silk-screen colour, as well as to remove the order number or not. You can of course fine-tune everything exactly as you want as well.


7) You can also select whether you want an SMD stencil, or have the board assembled after manufacturing. Please note that the assembly service, as well as the cost of your components, ARE NOT included in the initial quoted price. ( The quote will update depending on what options you select ).

8) When you are happy with the options that you have selected, you can click on the Save to Cart Button. From here on, you can go to the top of the screen, click on Cart, make any payment(s) or use any coupons that you have in your account.
Then just sit back and wait for your new PCB to be delivered to your door via the shipping company that you have selected during checkout.