I2C between Maker Nano and Kid-Bright32 (Esp32)

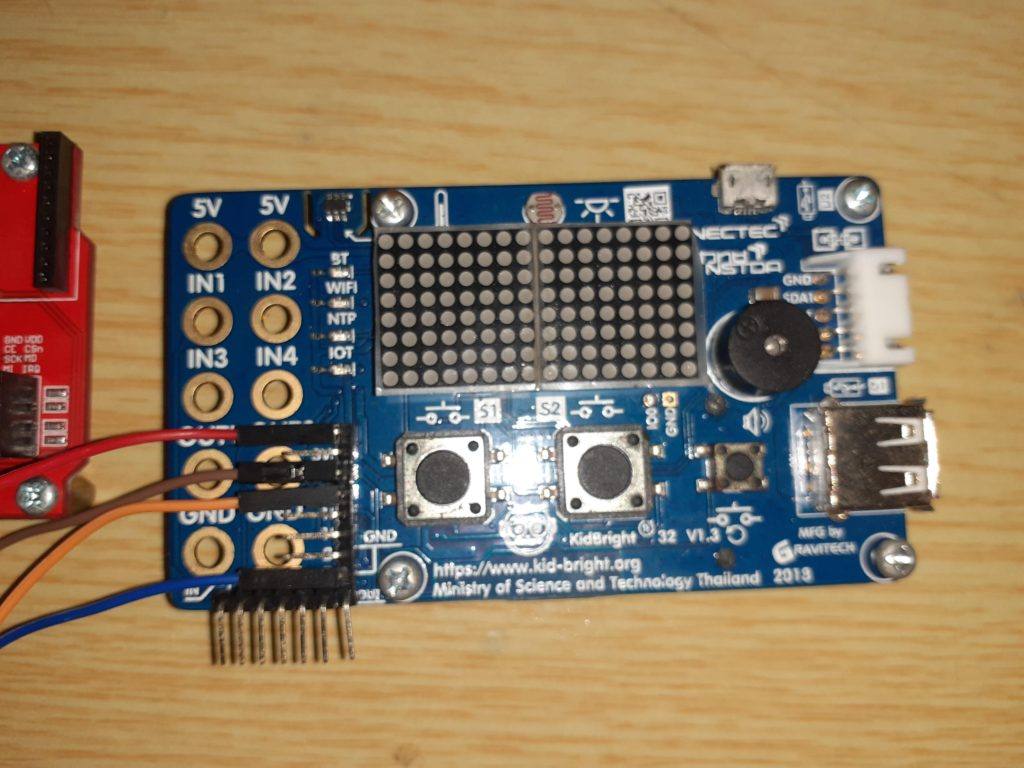
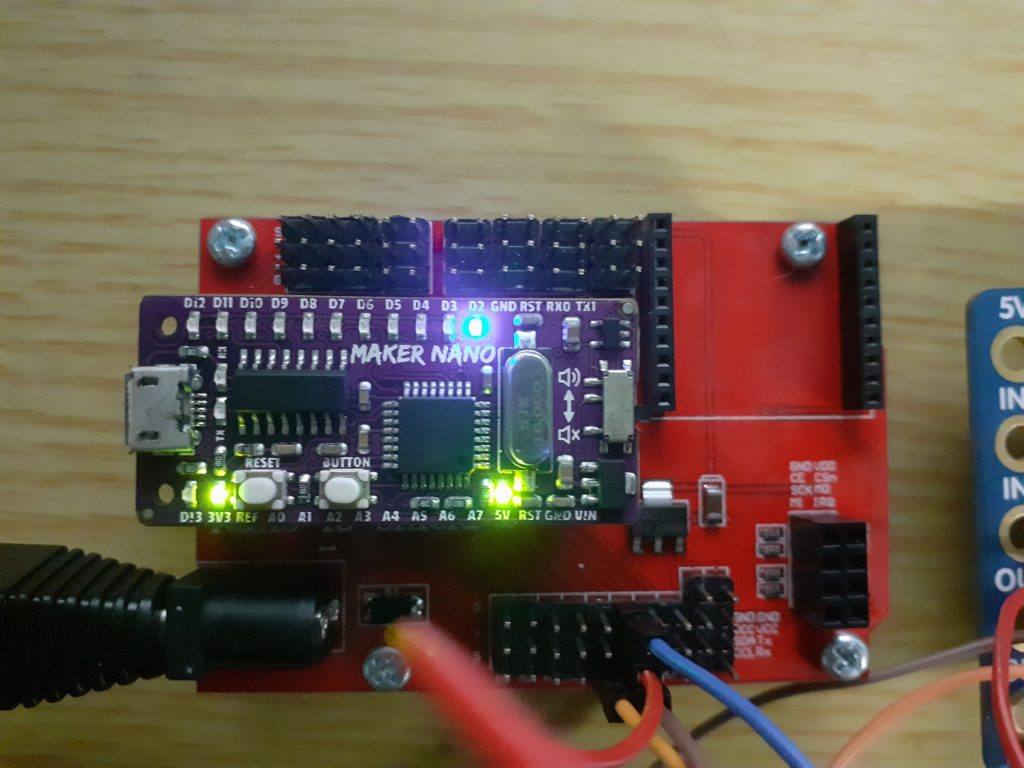
In our last post, we started looking at the workings of the I2C protocol. In case you missed that, you can read about that here. Today, I will continue with I2C by showing you how to implement the protocol between an Maker Nano (a Arduino Nano Clone) and Kid-Bright32 (a ESP32 based development and Education device).

This project will eventually be turned into an IoT device, with Google Assistant voice control. The Kid-Bright have very limited IO pins, and the Maker Nano has no Network Connectivity unless we use an Ethernet Shield. Enough of that for now, let us start with today’s tutorial, we will get back to this project later…

The Code for the Master

/* I2C Master Code - Kid Bright 32 v 1.3
   Can be adapted to Arduino or NodeMCU or STM32
   As it uses no special libraries, only the standard Wire.h
   that is already included with the Arduino IDE
*/

#include <Wire.h>

#define button1 16 // Button 1
#define button2 14 // Button 2
#define led_blue 17 // Led 1
#define led_red 2 // Led 2
#define led_yellow 15 // Led 3


void setup() {
  Wire.begin(); // Start I2C, join bus as a Master
  pinMode(button1,INPUT_PULLUP); // Set as input
  pinMode(button2,INPUT_PULLUP); 
  pinMode(led_blue,OUTPUT); // Set as output
  pinMode(led_red,OUTPUT);
  pinMode(led_yellow,OUTPUT);
  digitalWrite(led_blue,HIGH); // LED is Active Low
  digitalWrite(led_red,HIGH); // LED is Active Low
  digitalWrite(led_yellow,HIGH); // LED is Active Low
  Serial.begin(115200); // Start Serial for debugging
}

byte Data = 0; // Variable for sending data to the slave
int SlaveData = 0; // Variable for receiving data from the slave

void loop() {
  Wire.beginTransmission(4); // Send data to Slave at address #4
  Wire.write(Data); // Transmit one byte ( 8 bits)
  Wire.endTransmission(); // End Transmission
  Wire.requestFrom(4,1); // Request one (1) byte of data from the      //slave at address$
  while (Wire.available()) { // If data received
    SlaveData = Wire.read(); // Save it into a variable
  }

// We will implement a simple latch in software, where a single 
// button latches or releases a bit with every press and release.  
// This code should ideally include debouncing as well. It was left
// out for clarity.

  if (digitalRead(button1) == LOW) { // If button 1 pressed
    if (bitRead(Data,0) == HIGH) { // test if bit 0 in variable is set
      bitClear(Data,0); // clear it if it is set
    } else {
      bitSet(Data,0) == HIGH; // set bit to high
    }
  } 
// Do the same for the second button

  if (digitalRead(button2) == LOW) {
    if (bitRead(Data,1) == HIGH) {
      bitClear(Data,1);
    } else {
      bitSet(Data,1) == HIGH;
    }
  } 
 
// We will test for a set bit in the transmitted byte, and invert it, 
// as the LED's are active LOW

  digitalWrite(led_blue,!bitRead(Data,0)); // Toggle Led 1
  digitalWrite(led_red,!bitRead(Data,1)); // Toggle Led 2

// Same with the data received from the slave

  digitalWrite(led_yellow,!bitRead(SlaveData,0)); // Toggle Led 3
  
// Print Debug info on serial port
  
  Serial.print("Send to Slave 0xb");
  Serial.println(Data,BIN);
  Serial.print("Received from Slave 0xb");
  Serial.println(SlaveData,BIN);
  
 // Small delay, should change to millis in production code

  delay(200);
       
}
The Master Device. Connections are +5v (red) SCL (brown) SDA (orange) Ground (blue)

Code for the Slave

/*
     I2C Slave
     Arduino Nano or Compatible, can be used with ESP32 or STM32
     as well as no special libraries used, only standard Wire.h
*/

#include <Wire.h>

#define button 2 // A user button
#define led1 3 // Led 1
#define led2 4 // Led 2

byte Data = 0; // Variable for sending data to the Master

void setup() 
{
  pinMode(button,INPUT_PULLUP); // Set as Input
  pinMode(led1,OUTPUT);
  pinMode(led2,OUTPUT);
  digitalWrite(led1,LOW); // Led is Active High, so switch it off
  digitalWrite(led2,LOW);
  Wire.begin(4); // Join I2C Bus as device #4
  Wire.onReceive(receiveEvent); // Register receive Event
  Wire.onRequest(requestEvent); // Register request event
  Serial.begin(115200); // start serial debugging
  
}

void loop() {
// implement a software bit latch, on bit 0 of the Data variable
// the latch is toggled by pressing and releasing the button
// should ideally be debounced as well

 if (digitalRead(button) == LOW) {
  if (bitRead(Data,0) == HIGH) {
    bitClear(Data,0);
  } else {
    bitSet(Data,0) == HIGH;
  }
 }
 delay(200); // small delay
}

// This event will be triggered when the master requests data

void requestEvent() 
{
  Wire.write(Data); // Send data to the master
  Serial.print("Sending to Master 0xb");
  Serial.println(Data,BIN);
}
// This event gets triggered when the master sends data

void receiveEvent(int Quantity)
{
  int x = Wire.read(); // read the data ( one byte in this case)
  digitalWrite(led1,bitRead(x,0)); // Toggle LED 1 on Bit 0 state
  digitalWrite(led2,bitRead(x,1)); // Toggle LED 2 on Bit 1 state
  Serial.print("Received from Master 0xb"); // Debugginh
  Serial.println(x,BIN);

}
Maker Nano on an IO Shield, Connections are +5v (red) SCL (brown) SDA (orange) Ground (blue)

How does this work.

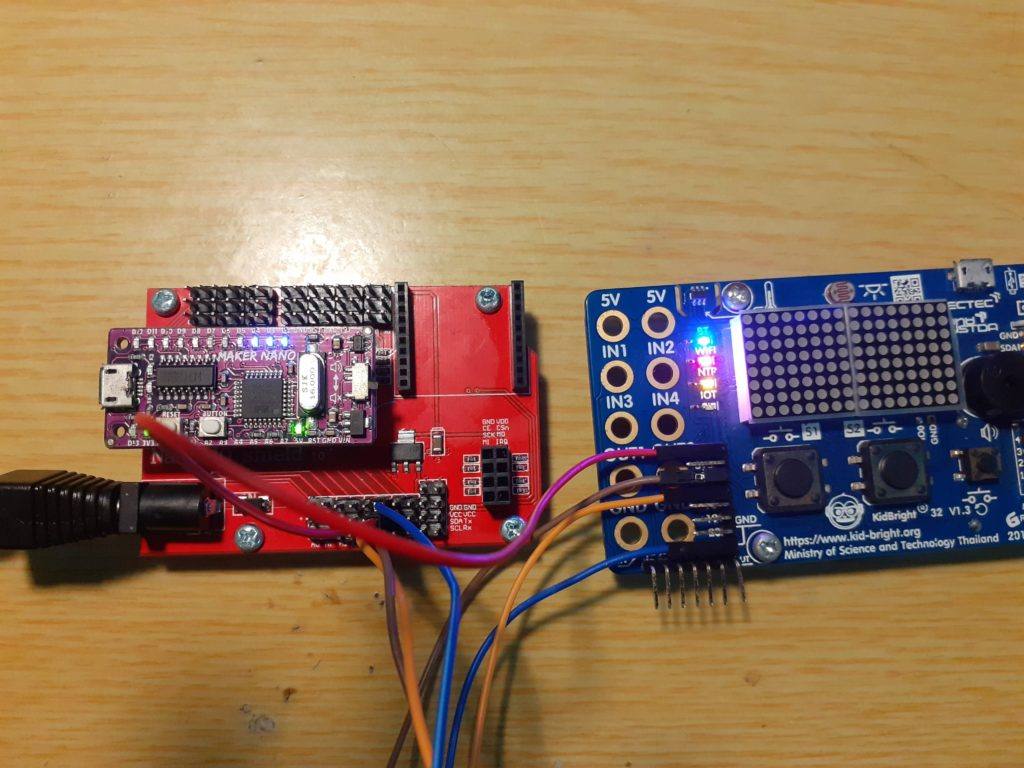
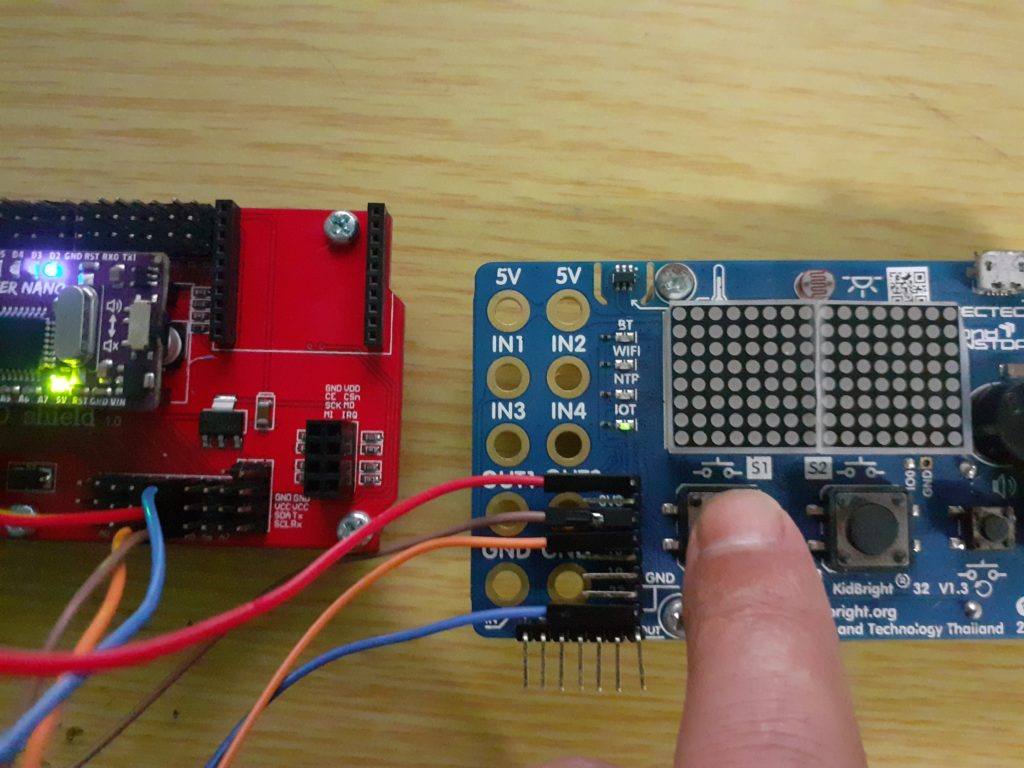
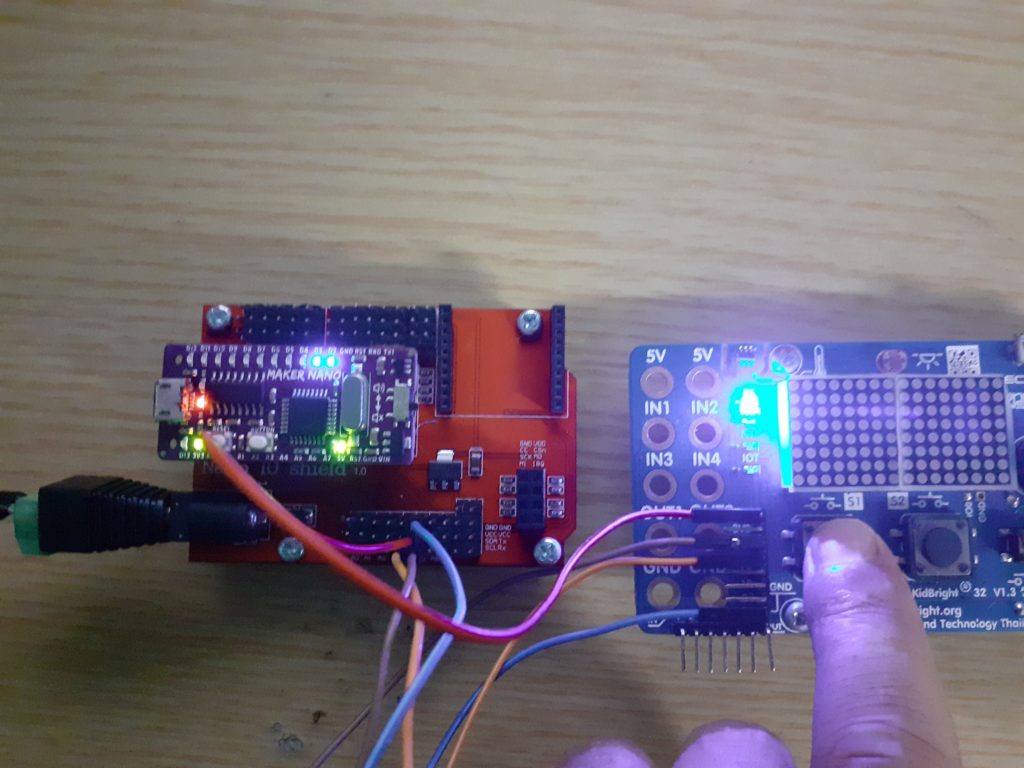
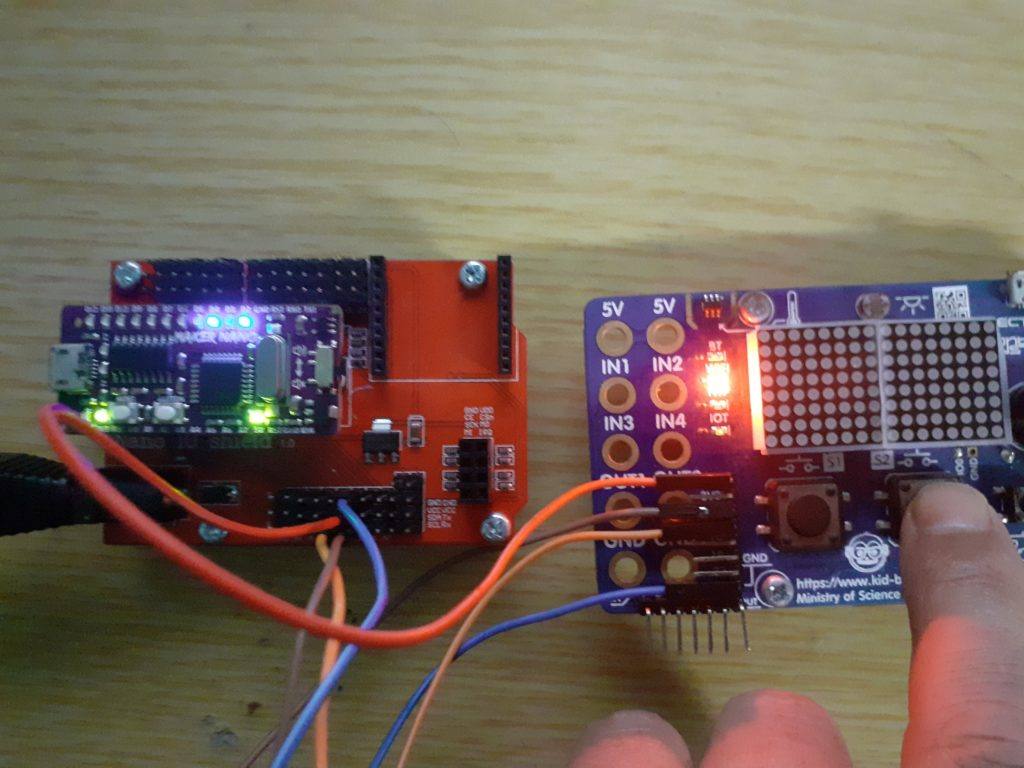
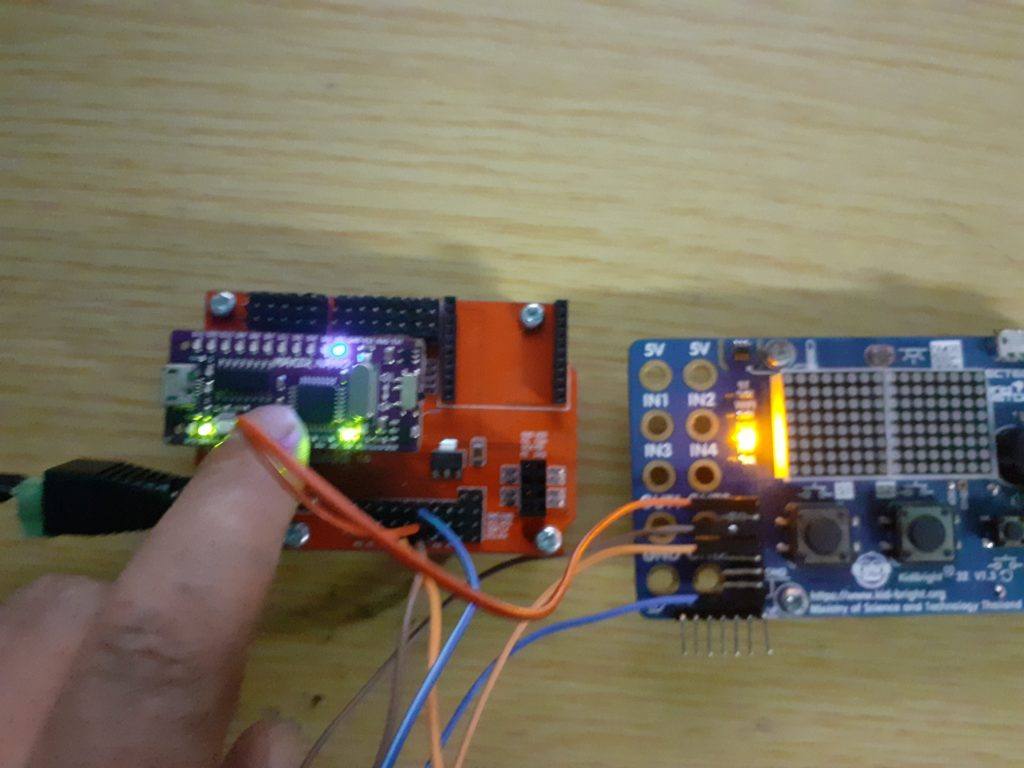
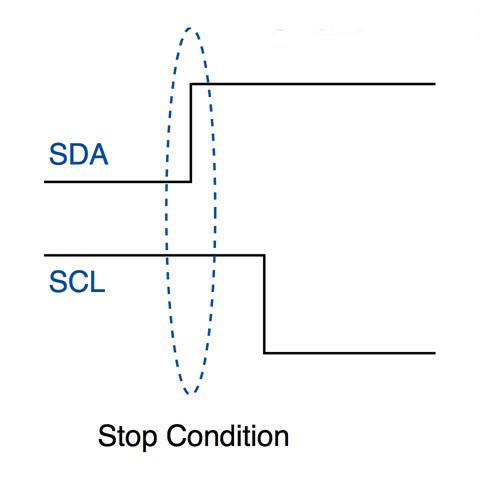
After uploading the code to the two boards, and connecting the boards to the I2C bus, we may power everything up. Please note that the boards MUST have a common ground. I have also powered both from the same supply. also make sure the SDA goes to SDA, and SCL to SCL… On a short distance like this, pull-up resistors are not required ( your milage may vary )

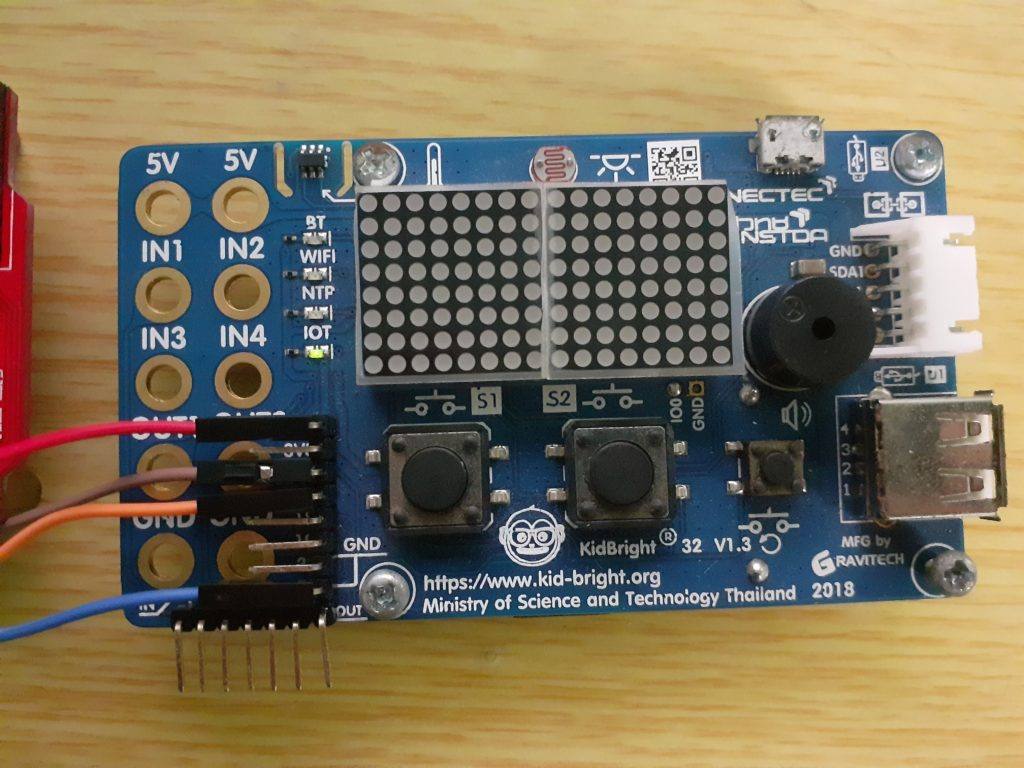
When we first power it up, is will seem as if nothing happened, but if you press and release one of the switches, the LED’s will light up, and stay lit until you press the switch again.

What next ?

In further parts of this, we will expand on this device, turning it into an IoT device, by combining many different skills that I have presented in previous tutorials.

What exactly is I2C?

In this post, I will tell you all the basics of the I2C protocol. What it is, where it comes from and also how it is configured and setup. We will also look at how data is transferred and received

Table of contents
1. Introduction
2. The Features of I2C
3. The Hardware
3.1 The physical I2C Bus
3.2 The Master and Slave devices on the bus
4. The data transfer protocol
4.1 The Start Condition
4.2 The Address Block
4.3 The Read/Write Bit
4.4 The ACK/NACK Bit
4.5 The Data Block
4.6 The Stop Condition
5. How does I2C work in practice
5.1 Sending data to a Slave Device
5.2 Reading data from a Slave Device
5.3 The Clock stretching concept

Introduction

I2C communication is the short form name for inter-integrated circuit protocol. It is a communication protocol developed by Philips Semiconductors for the transfer of data between a central processor and multiple integrated circuits on the same circuit board by using just two common wires.

Due to its simplicity, it is widely adopted for communication between microcontrollers and sensor arrays, displays, IoT devices, EEPROMs etc.

This is a synchronous serial communication protocol. It means that data bits are transferred one by one at regular intervals of time set by a reference clock line.

The Features of I2C

The I2C protocol has the following important features

  • Only two common bus lines (wires) are required to control any device/IC on the I2C network.
  • There is no need for a prior agreement on data transfer rate like in UART communications. The data transfer speed can thus be adjusted whenever it is required.
  • It has a simple mechanism for validating the transferred data.
  • It uses a 7-bit addressing system to target a specific device/IC on the I2C bus.
  • I2C networks are extremely easy to scale. New devices can simply be connected to the two common I2C bus lines.

The Hardware

The physical I2C Bus

The I2C Bus (Interface wires) consists of just two wires and are named Serial Clock Line (SCL) and Serial Data Line (SDA). The data to be transferred is sent through the SDA wire and is synchronized with the clock signal from SCL. All the devices/ICs on the I2C network are connected to the same SCL and SDA lines as shown in the image below:

The physical I2C Bus. All devices are connected to the same 2 wired on the bus, namely SDA and SCL

Both the I2C bus lines (SDA, SCL) are operated as in open-drain driver mode. It means that any device/IC on the I2C network can drive(pull) SDA and SCL low, but they cannot drive them high. So, a pull-up resistor is used on each bus line, to keep them high (at positive voltage) by default.

This is to prevent the bus from shorting, which might happen when one device tries to pull the line high and some other device tries to pull the line low.

The Master and Slave Devices on the I2C Bus

The devices connected to the I2C bus are categorized as either masters or slaves. At any instant of time, only a single master stays active on the I2C bus. It controls the SCL clock line and decides what operation is to be done on the SDA data line.

All the devices that respond to instructions from this master device are slaves. For differentiating between multiple slave devices connected to the same I2C bus, each slave device is physically assigned a permanent 7-bit address.

When a master device wants to transfer data to or from a slave device, it specifies this particular slave device address on the SDA line and then proceeds with the transfer. So effectively communication takes place between the master device and a particular slave device.

All the other slave devices don’t respond unless their address is specified by the master device on the SDA line.

The Master and Slave Devices on the I2C Bus. Note that each Slave device has it’s own address.

The Data Transfer Protocol

The protocol (set of rules) that is followed by the master device and slave devices for the transfer of data between them works as follows:

Data is transferred between the master device and slave devices through the SDA data line, via patterned sequences of 0’s and 1’s (bits). Each sequence of 0’s and 1’s is called a transaction and each data transaction is structured as in the image below:

The structure of an I2C Data transaction

The Start Condition

Whenever a master device/IC decides to start a transaction, it switches the SDA line from a high level to a low level before the SCL line switches from high to low.

Once a start condition is sent by the master device, all the slave devices get active even if they were in sleep mode, and wait for the address bits to see which device should respond.

The I2C Start Condition. Note that SDA Switches LOW before SCL. All slave devices on the bus will now listen for an address bit to decide which device should respond.

The Address Block

The Address block is comprised of 7 bits and are filled with the address of slave device (in binary) to/from which the master device needs to send/receive data. All the slave devices on the I2C bus will compare these address bits with their own address.

The Read/Write Bit

This bit specifies the direction that the data must be transferred in. If the master device/IC needs to send data to a slave device, this bit is set to ‘0’. If the master device/IC needs to receive data from the slave device, it is set to ‘1’.

The ACK/NACK Bit

This is the Acknowledged/Not-Acknowledged bit. If the physical address of any slave device is the same as the address that was broadcasted by the master device, that slave device will set the value of this bit to ‘0’ . If there are no slave device(s) with the broadcasted address, this bit will remain at logic ‘1’ (default). This will tell the master that the data/command has been received and/or acknowledged by a slave device.

The Data Block

The data block is comprised of 8 bits and they are set by the transmitter,wheather this be the master or the slave, depending on wheather a read or a write operation was requested, with the data bits that needs to transfered to the receiver. This block is followed by an ACK/NACK bit that is set to ‘0’ by the receiver if it successfully receives data. Otherwise it stays at logic ‘1’.

This combination of data blocks followed by an ACK/NACK bit is repeated until all the data is completely transferred.

The Stop Condition

After all the required data blocks are transferred through the SDA line, the master device switches the SDA line from low to high before the SCL line switches back from high to low.

The I2C Stop condition. This signals the end of a transaction. Note SDA returns to High BEFORE the SCL line is pulled High.

How does I2C work in practice

When an I2C transaction is initiated by a master device either to send or receive data to/from a slave device, all of the processes mentioned above will happen at least one.
Let us look at a typical scenario for each of the different type of scenarios.

Sending Data to a Slave Device

The following sequence of operations will take place when a master device tries to send data to a particular slave device through I2C bus:

  • The master device sends a start condition
  • The master device sends the 7 address bits which correspond to the slave device to be targeted
  • The master device sets the Read/Write bit to ‘0’, which signifies a write
  • Now two scenarios are possible:
    • If no slave device matches with the address sent by the master device, the next ACK/NACK bit stays at ‘1’ (default). This signals the master device that the slave device identification is unsuccessful. The master clock will end the current transaction by sending a Stop condition or a new Start condition
    • If a slave device exists with the same address as the one specified by the master device, the slave device sets the ACK/NACK bit to ‘0’, which signals the master device that a slave device is successfully targeted
  • If a slave device is successfully targeted, the master device now sends 8 bits of data which is only considered and received by the targeted slave device. This data means nothing to the remaining slave devices
  • If the data is successfully received by the slave device, it sets the ACK/NACK bit to ‘0’, which signals the master device to continue
  • The previous two steps are repeated until all the data is transferred
  • After all the data is sent to the slave device, the master device sends the Stop condition which signals all the slave devices that the current transaction has ended

The image below represents the transaction with the data bits sent on the SDA line and the device that controls each of them:

I2C Master sending data to a slave device

Reading Data from a Slave Device

The sequence of operations remain the same as in previous scenario except for the following:

  • The master device sets the Read/Write bit to ‘1’ instead of ‘0’ which signals the targeted slave device that the master device is expecting data from it
  • The 8 bits corresponding to the data block are sent by the slave device and the ACK/NACK bit is set by the master device
  • Once the required data is received by the master device, it sends a NACK bit. Then the slave device stops sending data and releases the SDA line

If the master device to read data from specific internal location of a slave device, it first sends the location data to the slave device using the steps in previous scenario. It then starts the process of reading data with a repeated start condition.

The below figure represents the overall data bits sent on the SDA line and the device that controls each of them:

Reading data from a Slave device on the I2C bus

The Clock Stretching concept

Let say the master device started a transaction and sent address bits of a particular slave device followed by a Read bit of ‘1’. The specific slave device needs to send an ACK bit, immediately followed by data.

But if the slave device needs some time to fetch and send data to master device, during this gap, the master device will think that the slave device is sending some data.

To prevent this, the slave device holds the SCL clock line low until it is ready to transfer data bits. By doing this, the slave device signals the master device to wait for data bits until the clock line is released

Conclusion

This concludes this tutorial. In a future post, I will show you how to use I2C to transfer data between two micro-controllers.


A glance back in History – Manufacturing your own transistors – At home!

We are living in an industrial age, electronics components are easily available. They are dirt cheap. I would like to share a few pages from an old book that I have recently found on a book-archive site on the internet. It is freely available for download, so I thought I would add a bit of history and share it with my fellow electronics enthusiasts…

The Book is called “Practical Transistors and Transistor Circuits” by JS Kendal.
It was first published in August 1954…

This is chapter 1, which I find the most interesting, I sincerely hope you will find it interesting too.

I hope that you have enjoyed the journey back in time… Thank you

Extending the Inputs and Outputs of your Arduino/ESP32/STM32

There will come a time that you will run out of available input or output pins on your Arduino/ESP32 or STM32 device. Today, I will show you one way to work around this problem and how to add additional input and/or outputs to your device.

There are many ways to do this, the easiest of them being adding some sort of i2c
chip (the Waveshare PCF8574 IO Expansion Board is a good example).

This particular device can be cascaded to provide up to 64 IO ports on the i2c bus.

At Maker and IoT Ideas, we would however like to show you electronics that you can build yourself, or stuff that have not already been made up into some kind of commercial project.

So, keeping this DIY attitude going, I will teach you how to use a shift register today.

Before we do that, we have to look at what a shift register is, and how they work…

A shift register, at its basic level, is actually just a series of D Type Flip-Flops.

D Type Flip Flop

These flip flops are connected together to give this

Parallel in, Serial out Shift Register

There are three basic types of Shift Register
– Serial In, Serial Out (SISO)
– Serial In, Parallel Out (SIPO) and
– Parallel In, Serial Out (PISO)

We can see that they these type of shift registers are mainly used to convert between an serial and parallel data interface.

Serial In, Serial Out ( SISO)

This is the easiest configuration for a shift register. It is basically just a row of flip flops, with the output of the first, connected to the input of the next… and so on. This type of shift register is mainly used to introduce a delay into the data stream. This means that for a 8 bit SISO Shift register, the first data will only appear at the output after 8 clock cycles !

Serial In, Parallel Out (SIPO)

This kind of Shift Register has the same configuration as the SISO type, but it differs in that there is output after every flip-flop. That makes this type of shift register a good choice to use to extend the outputs on a microcontroller like Arduino or ESP32. The downside of using a shift register as a parallel output device is that the outputs will be slightly slower than if you used the native outputs on the microcontroller.

Parallel In, Serial Out (PISO)

A Parallel In, Serial out shift register can be used to read inputs from buttons or other digital devices. These inputs are then serially shifted into a serial pin on the microcontroller to be processed. It is also slightly slower than if you used the native inputs on the microcontroller.

Universal Shift register

You are also able to use a universal shift register. These chips can be used as both inputs and outputs. They are however only available in a 4 bit configuration.

The Chips (IC’s)

TYPELOGICCHIP NUMBERBITS
SISO / SIPOTTL74HC5958 bit
SIPOTTL74LS1648 bit
PISOTTL74HC1668 bit
UNIVERSALTTL74LS1944 bit
UNIVERSALTTL74LS1954 bit
UNIVERSALCMOSCD40354 bit
Some common Shift Register Chips

Example using Arduino with 74HC595n SIPO Shift Register

We will look at an example to connect the 74HC5959N to Arduino to drive eight (8) LEDs.
This example can be adapted to drive other loads as well by using a small BJT transistor and current limiting resistor instead of the LED

74hc595n Pin NumberDescription and Connection
Q0…Q7 (15,1,2,3,4,5,6,7)Parallel outputs of the shift register to write up to 8 signals with only 3 pins on your Arduino or ESP32 microcontroller
GND (8)Connect to the ground on the microcontroller
VCC (16)Connect to 3.3V or 5V on the microcontroller
DS (14)Serial data input has to be connected to the microcontroller (in this example D4)
OE (13)Output enable input do we not need and connected to ground
STCP (Latch) (12)Storage register clock input has to be connected to the microcontroller (in this example D5)
SHCP (11)Shift register clock input has to be connected to the microcontroller (in this example D6)
MR (10)Master reset connected to VCC because is active with LOW and we do not want to reset the register
Q7S (9)Serial data output not needed and therefore not connected
Connections for 74HC595n to Arduino

The operation of the 74hc595n SIPO Shift Register can easily be explained in three steps:

  1. The latch (STCP pin) is pulled LOW because the data is only stored in the register on a LOW to HIGH transition of this pin.
  2. Data is shifted out to the register with the data pin (DS) and with a LOW to HIGH transition of the clock signal (SHCP).
  3. The latch (STCP pin) is pulled HIGH to save the data in the register.

Make the following connections to your Arduino and Breadboard ( we will use Arduino Nano today, but you can use the same pins and code for Arduino Uno )

Breadboard Layout for 74HC595 Shift Register as Output Extender with Arduino Nano
Schematic Diagram for using 74HC595 Shift Register as Output Extender with Arduino Nano

Double-check all your connections, and then you can start the coding. The code will be much easier than you may think, as there is already a builtin function in the Arduino C language that we will use to shift the data out to the register.

// Define the Control Pins for the register
int latch-Pin = 5;
int clock-Pin = 7;
int data-Pin = 6;

void setup()
{
pinMode(latch-Pin, OUTPUT);
pinMode(data-Pin, OUTPUT);
pinMode(clock-Pin, OUTPUT);

Serial.begin(9600);
}

void loop()
{
byte leds = 0;
updateShiftRegister();
delay(1000);
for (int i = 0; i < 8; i++)
{
bitSet(leds, i);
updateShiftRegister();
for (int i = 7; i >= 0; i–)
{
bool b = bitRead(leds, i);
Serial.print(b);
}
delay(1000);
Serial.println(” “);
}
}

void updateShiftRegister()
{
digitalWrite(latch-Pin, LOW);
shiftOut(data-Pin, clock-Pin, LSBFIRST, less);
digitalWrite(latch-Pin, HIGH);
}

In this example, we output a HIGH to each led in turn, shifting from 0 to 7.

I hope that this will make sense to everybody, and be useful.
Questions and comments are welcome. Next time, we will look as using a PISO Shift register to extend the inputs on you Arduino/ESP32/STM32

Thank you.

Useful Circuits using NAND Gates – Logic Gates Part 2

In part one of this series, I showed you how to construct the basic logic gates using transistors and a few resistors. Today I will expand on that by showing you two very simple, but useful circuits, constructed with NAND gates, as well as a handful of other components.

The first circuit will be a Capacitive On/OFF Switch, Based on the CD4011 CMOS Quad NAND Gate. I draw the circuit to function on 5v, but you can also change the relay and use it with a supply voltage of up to 12v DC

Let use look at the circuit

Capacitive Switch using CD4011 CMOS Quad Nand IC

As we can see here, the two NAND gates are configured as a LATCH or R/S Flip Flop. Touching the “ON” touch plate causes a change in the input logic, making the latch change state and switching ON the output. Touching the “OFF” touch plate, resets the latch, switching the output OFF.

You can also send the input directly to a microcontroller like Arduino. In that case you would take the output at pin 1 through a resistor to the input of the microcontroller.

The circuit can also work in reverse logic, as pin 4 will be the complementary state of pin 1, thus off becomes 1 and on becomes 0

Our second circuit for today is a PWM motor controller, made using 4 NAND gates, a few resistors, capacitors, diodes, a mosfet and a variable resistor.

PWM Motor Controller using NAND Gates

In this circuit, Nand Gate U7.1 generates the PWM frequency, as well as changes the on-off period of the PWM signal via R37, as the user turns the pot, the charge-discharge time of C1 is changed, thus altering the duty cycle of the signal.

This is thus an effective, low component way to do PWM motor control without a microcontroller.

Next week, I will introduce another two usefull NAND Gate based circuits for you to try out.

Previous Posts

A short list of previous posts available on the old website


Arduino and STM32 “Blue Pill”

Arduino with LCD

Arduino with HC-SR04 Ultrasonic Sensor

Arduino nRFL01+ Rf Module Remote IO Extender

Arduino SPI data to STM32

How to program the STM32 “Blue Pill” with Arduino IDE

How to use the native USB port to upload code to the STM32 “Blue Pill”

Electronics tutorials and circuit diagrams

What is an H-Bridge Motor Controller

An H-Bridge Motor Controller Code Example for Arduino

PCB Files for building your own H-Bridge controller – FREE DOWNLOAD

Logic Building Blocks – The Logic Gates