
Today I will show you another useful IO Expander chip, The MCP23017. This chip, although similar to the PCF8475, which I have already covered in a previous article, has many additional features that may make it a very attractive solution when you need some more extra GPIO pins for a big project…
Features
Let us look at some of the features of this chip
- 16-Bit Remote Bidirectional I/O Port:
- I/O pins default to input
• High-Speed I2C Interface (MCP23017): - 100 kHz
- 400 kHz
- 1.7 MHz
• High-Speed SPI Interface (MCP23S17): - 10 MHz (maximum)
• Three Hardware Address Pins to Allow Up to
Eight Devices On the Bus
• Configurable Interrupt Output Pins: - Configurable as active-high, active-low or
open-drain
• INTA and INTB Can Be Configured to Operate
Independently or Together
• Configurable Interrupt Source: - Interrupt-on-change from configured register
defaults or pin changes
• Polarity Inversion Register to Configure the
Polarity of the Input Port Data
• External Reset Input
• Low Standby Current: 1 µA (max.)
• Operating Voltage: - 1.8V to 5.5V @ -40°C to +85°C
- 2.7V to 5.5V @ -40°C to +85°C
- 4.5V to 5.5V @ -40°C to +125°C
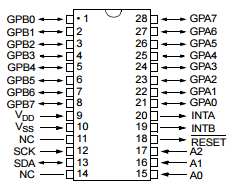
The sixteen I/O ports are separated into two ‘ports’ – A (on the right) and B (on the left. Pin 9 connects to 5V, 10 to GND, 11 isn’t used, 12 is the I2C bus clock line (Arduino Uno/Duemilanove analogue pin 5, Mega pin 21), and 13 is the I2C bus data line (Arduino Uno/Duemailnove analogue pin 4, Mega pin 20).
External pull-up resistors should be used on the I2C bus – in our examples we use 4.7k ohm values. Pin 14 is unused, and we won’t be looking at interrupts, so ignore pins 19 and 20. Pin 18 is the reset pin, which is normally high – therefore you ground it to reset the IC. So connect it to 5V!
Finally we have the three hardware address pins 15~17. These are used to determine the I2C bus address for the chip. If you connect them all to GND, the address is 0x20. If you have other devices with that address or need to use multiple MCP23017s, see figure 1-2 in the datasheet.
You can alter the address by connecting a combination of pins 15~17 to 5V (1) or GND (0). For example, if you connect 15~17 all to 5V, the control byte becomes 0100111 in binary, or 0x27 in hexadecimal.
It is also available on a convenient breakout PCB, for about $USD0.80 from AliExpress


Please Note: THIS BREAKOUT PCB IS NOT SUITED FOR USE ON A BREADBOARD. YOU WILL SHORT OUT VCC AND GROUND AS WELL AS ALL THE IO PINS IF YOU TRY TO USE IT ON A BREADBOARD.
As you can see, the pins are however very clearly labelled, and thus easy to use. I have also purposely soldered my header pins “the wrong way round” to prevent using it on a breadboard, as this will short out Vcc to Ground!
Having interrupt outputs is one of the most important features of the MCP23017, since the microcontroller does not have to continuously poll the device to detect an input change. Instead an interrupt service routine can be used to react quickly to an input change such a key press…
To make life even easier each GPIO input pin can be configured with an internal pullup (~100k) and that means you won’t have to wire up external pull up resistors for keyboard input. You can also mix and match inputs and outputs the same as any standard microcontroller 8 bit port.
Addressing
The 23017 has three input pins to allow you to set a different address for each attached MCP23017.
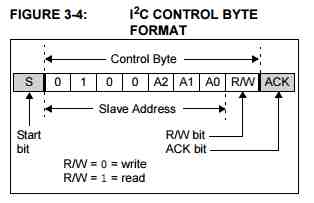
The above corresponds to a hardware address for the three lines A0, A1, A2 corresponding to the input pin values at the IC. You must set the value of these hardware inputs as 0V or (high) volts and not leave them floating otherwise they will get random values from electrical noise and the chip will do nothing!
The four left most bits are fixed a 0100 (specified by a consortium who doles out address ranges to manufacturers).
So the MCP23017 I2C address range is 32 decimal to 37 decimal or 0x20 to 0x27 for the MCP23017.
Please note: The addresses are the same as those for the PCF8475. You must thus be careful if you use these two devices on the same i2c bus!
MCP23017 Non interrupt registers
IODIR I/O direction register
For controlling I/O direction of each pin, register IODIR (A/B) lets you set the pin to an output when a zero is written and to an input when a ‘1’ is written to the register bit. This is the same scheme for most microcontrollers – the key is to remember that zero (‘0’) equates to the ‘O’ in Output.
GPPU Pullup register
Setting a bit high sets the pullup active for the corresponding I/O pin.
OLAT Output Latch register
This is exactly the same as the I/O port in 18F series PIC chips where you can read back the “desired” output of a port pin whether or not the actual state of that pin is reached. i.e. consider a strong current LED attached to the pin – it is easily possible to pull down the output voltage at the pin to below the logic threshold i.e. you would read back a zero if reading from the pin itself when in fact it should be a one. Reading the OLAT register bit returns a ‘one’ as you would expect from a software engineering point of view.
IPOL pin inversion register
The IPOL(A/B) register allows you to selectively invert any input pin. This reduces the glue logic needed to interface other devices to the MCP23017 since you won’t need to add inverter logic chips to get the correct signal polarity into the MCP23017.
It is also very handy for getting the signals the right way up e.g. it is common to use a pull up resistor for an input so when a user presses an input key the voltage input is zero, so in software you have to remember to test for zero.
Using the MCP23017 you could invert that input and test for a 1 (in my mind a key press is more equivalent to an on state i.e. a ‘1’) however I use pullups all the time (and uCs in general use internal pullups when enabled) so have to put up with a zero as ‘pressed’. Using this device would allow you to correct this easily.Note: The reason that active low signals are used everywhere is a historical one: TTL (Transistor Transistor Logic) devices draw more power in the active low state due to the internal circuitry, and it was important to reduce unnecessary power consumption – therefore signals that are inactive most of the time e.g. a chip select signal – were defined to be high. With CMOS devices either state causes the same power usage so it now does not matter – however active low is used because everyone uses it now and used it in the past.
SEQOP polling mode : register bit : (Within IOCON register)
If you have a design that has critical interrupt code e.g. for performing a timing critical measurement you may not want non critical inputs to generate an interrupt i.e. you reserve the interrupt for the most important input data.
In this case, it may make more sense to allow polling of some of the device inputs. To facilitate this “Byte mode” is provided. In this mode, you can read the same set of GPIOs using clocks but not needling to provide other control information. i.e. it stays on the same set of GPIO bits, and you can continuously read it without the register-address updating itself. In non-byte mode, you either have to set the address you read from (A or B bank) as control input data.
Now to examine how to use the IC in our sketches.
As you should know by now most I2C devices have several registers that can be addressed. Each address holds one byte of data that determines various options. So before using we need to set whether each port is an input or an output. First, we’ll examine setting them as outputs. So to set port A to outputs, we use:
Wire.beginTransmission(0x20);
Wire.write(0x00); // IODIRA register
Wire.write(0x00); // set all of port A to outputs
Wire.endTransmission();
Then to set port B to outputs, we use:
Wire.beginTransmission(0x20);
Wire.write(0x01); // IODIRB register
Wire.write(0x00); // set all of port B to outputs
Wire.endTransmission();
So now we are in void loop() or a function of your own creation and want to control some output pins. To control port A, we use:
Wire.beginTransmission(0x20);
Wire.write(0x12); // address port A
Wire.write(??);  // value to send
Wire.endTransmission();
To control port B, we use:
Wire.beginTransmission(0x20);
Wire.write(0x13); // address port B
Wire.write(??);  // value to send
Wire.endTransmission();
… replacing ?? with the binary or equivalent hexadecimal or decimal value to send to the register.
To calculate the required number, consider each I/O pin from 7 to 0 matches one bit of a binary number – 1 for on, 0 for off. So you can insert a binary number representing the status of each output pin. Or if binary does your head in, convert it to hexadecimal. Or a decimal number.
So for example, you want pins 7 and 1 on. In binary that would be 10000010, in hexadecimal that is 0x82, or 130 decimal. (Using decimals is convenient if you want to display values from an incrementing value or function result).
For example, we want port A to be 11001100 and port B to be 10001000 – so we send the following (note we converted the binary values to decimal):
Wire.beginTransmission(0x20);
Wire.write(0x12); // address port A
Wire.write(204); // value to send
Wire.endTransmission();
Wire.beginTransmission(0x20);
Wire.write(0x13); // address port B
Wire.write(136);     // value to send
Wire.endTransmission();
A complete Example
// pins 15~17 to GND, I2C bus address is 0x20
#include "Wire.h"
void setup()
{
 Wire.begin(); // wake up I2C bus
// set I/O pins to outputs
 Wire.beginTransmission(0x20);
 Wire.write(0x00); // IODIRA register
 Wire.write(0x00); // set all of port A to outputs
 Wire.endTransmission();
Wire.beginTransmission(0x20);
 Wire.write(0x01); // IODIRB register
 Wire.write(0x00); // set all of port B to outputs
 Wire.endTransmission();
}
void binaryCount()
{
 for (byte a=0; a<256; a++)
 {
 Wire.beginTransmission(0x20);
 Wire.write(0x12); // GPIOA
 Wire.write(a); // port A
 Wire.endTransmission();
Wire.beginTransmission(0x20);
 Wire.write(0x13); // GPIOB
 Wire.write(a); // port B
 Wire.endTransmission();
 }
}
void loop()
{
 binaryCount();
 delay(500);
}
Using the pins as inputs
Although that may have seemed like a simple demonstration, it was created show how the outputs can be used. So now you know how to control the I/O pins set as outputs. Note that you can’t source more than 25 mA of current from each pin, so if switching higher current loads use a transistor and an external power supply and so on.
Now let’s turn the tables and work on using the I/O pins as digital inputs. The MCP23017 I/O pins default to input mode, so we just need to initiate the I2C bus. Then in the void loop() or other function all we do is set the address of the register to read and receive one byte of data.
// pins 15~17 to GND, I2C bus address is 0x20
#include "Wire.h"
byte inputs=0;
void setup()
{
 Serial.begin(9600);
 Wire.begin(); // wake up I2C bus
}
void loop()
{
 Wire.beginTransmission(0x20);
 Wire.write(0x13); // set MCP23017 memory pointer to GPIOB address
 Wire.endTransmission();
 Wire.requestFrom(0x20, 1); // request one byte of data from MCP20317
 inputs=Wire.read(); // store the incoming byte into "inputs"
 if (inputs>0) // if a button was pressed
 {
 Serial.println(inputs, BIN); // display the contents of the GPIOB register in binary
 delay(200); // for debounce
 }
}
Other Libraries
You can also download and install the MCP23017 Library from Adafruit for the Arduino IDE.
This library will make using this chip even easier… I will discuss this library in another post
I hope this will be useful to somebody.